Sunday, August 30, 2009

Happy T Day

To all the teachers out there...Happy Teachers' Day....

Many a time, teachers are just being taken for granted. When T Day arrives, they will receive many of the commercial gifts easily bought from shops capitalising on the fact that parents adopt the easy way out to just pick up these ready wrapped items.

This year, eversince the baking craze, I have been racking my brain two weeks ago thinking of what to prepare for my kids teachers as I feel they have to be given the recognition they deserve. From easy cupcakes to cookies to baked cakes, layered cakes, assorted flavours etc....sigh...with my limited capacity as a baker and most of all, someone who knows nuts about decoration (or absolutely no acquired decoration skills yet), trying to think of something beautiful, easy and edible is a mean feat. Some might say...aiya...go buy la ! Of course I could do that, but wouldn't it be more meaningful to have something done from scratch and presented it with thoughtfulness.....I wonder how many teachers would appreciate that too but then again, let the kids learn how to show their appreciation and how making something for someone special creates that special kind of feeling in them.

So finally the day arrived and I realised that making cookie lollipops is easy for them to bring to school. So inspired by
HappyHomeBaking Pooh cookies, I thought of the most simple design using the cookie cutters which I bought from DAISO to combine the shapes into one cookie. We designed the cookie and tried one batch but it turned out crusty and cracked when lifted. So we had to improvise by thinking of a way to insert the lollipop sticks without cracking the dough which was soft and delicate.
So here's the result of the dough on a stick with our humble design......


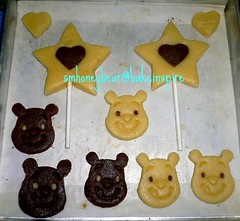
After a few attempts and getting better at handling the dough, I managed to make 3 batches and about 15 lollipops plus some pooh bear cookies which I experimented with the remaining dough.

And here's the baked and packaged version.....


This is the final version with gift tags done by Nicole. I hope the teachers will enjoy it just as much as we have enjoyed baking them.

Monday, August 24, 2009

Puffed-Up Confidence

The fact that I started baking was because I want to know what goes into the food that we are eating. I try to cook healthy meals for the kids. Even when I'm cooking instant noodles for them, I choose the kind with the 'Healthier Choice' label, and without added msg.

Van loves the croissant from Giant. They sell it in a pack of 5 at around $2+ or $3+ I can't remember, and we don't shop there often. I thought to myself, why don't I learn how to make puff pastry so that Van can have croissant any time she wishes?

In my previous post, I talked about my unsuccessful puff pastry adventure(s). Every unsuccessful attempt makes me that much wiser. With a little prayer to St Jude (patron saint for lost, desperate cases) and a lot of love and sincerity as additional secret ingredients, I was able to turn out some decent pastries on my 5th attempt.

You might ask, "Is it worth the effort when you can buy a pack of frozen pastry off the shelf?" My answer to you is, "Yes, it's worth every bit of time and effort spent." Especially so when my dad finished every single croissant I made specially for him, and even more so when your husband tells you "Is there a word better than superb to describe the breakfast?"

Let me now reveal my lessons learnt from this whole experience.

Lesson 1

I lifted the recipe off from this blog. I wonder if the brand of butter used makes any difference. I tried Anchor, Emborg and SCS butter. My latest attempt was made using SCS unsalted butter all because Emborg was out of stock. SCS butter doesn't come cheap. Anyway, I didn't use the 260g of butter called for in the recipe, I just used the whole block of whichever type of butter I bought. Also, instead of melting the butter for the Détrempe dough, I cut the butter into 1 inch cubes and rubbed it into the flour until the mixture resembles bread crumbs.

Lesson 2

If you have an air-conditioned kitchen, good on you, because making puff pastry in a 32˚C kitchen not only melts the butter in the dough super fast, it also melts your patience. The initial wrapping of dough over the butter is the stage where things get a little messy. Always remember to seal up the part where the dough folds over the butter. Once the butter seeps out, it'll get extremely messy. Look out for signs of butter melting. The most we can roll and fold in our Singapore temperature is twice. Place the dough in the freezer for about 15 mins and start process all over.

Lesson 3

There's no need to dust flour on table. Work your dough between 2 sheets of wax or greaseproof paper. It's easier to lift dough off and also makes cleaning up easier (esp when you don't have a domestic helper to clean up for you).

Lesson 4

I wonder if the number of times you roll and fold makes any difference. In my previous attempts, in my eagerness to achieve the flaky and layered effect, I guessed I roll and fold until I lost count. Perhaps the ideal would be between 4-6 roll and folds.

Lesson 5

As I have mentioned in my previous post, never scrunch up the dough as the layers created by the roll and fold would all have been lost.

Try this if you have the time. I'm really proud of myself. I'm sure you would too.

Wednesday, August 5, 2009

SweetTalk

If it's within my capability, I'll try to learn how to make a particular food that my loved ones like. One of Ken's favourite breakfast item is the Pork Floss bread from BreadTalk, and I've always wanted to know what goes into the spread that makes the bread so unique.

Digging through my cookbooks, I found a book that was buried deep and almost forgotten. It's titled "I Can Bake" by Agnes Chang. Flipping through the pages, I saw this Pork Floss bun grinning back at me. Hey! I've got it all along in my drawer and I didn't even know!

I used my old, trusted bread dough recipe, and with a little ingenuity, I made breakfast that my kids and dear husband enjoyed. Imagine my joy when Gab thought I bought the bread from BreadTalk. HAHA! *on cloud nine*

This is the "Before" scene. Plain buns on the left and hotdog star buns on the right.


After baking, the hotdog star bun looks like this. For Ivan's breakfast, I put some of the spread (I'll call it CondensedMayo spread henceforth) in the middle of the bun and sprinkled some floss on top. I left it as it is for Vanessa's bread as she doesn't like the spread.


I used chicken floss bought from 美珍香. Here's the floss bun.


Ingredients
Bread Dough
  • 400g bread flour
  • 100g wholemeal flour (If not using, just use 500g bread flour)
  • 1 packet yeast (11g)
  • 1/2 tsp salt
  • 120g unsalted butter (can use salted if you want. I prefer to use
    unsalted
    )
  • 70g sugar
  • 1 cup water
  • 2 eggs (1.5 eggs for the bread dough, the rest of the 1/2 beaten egg
    used to glaze bread afterwards
    )

CondensedMayo Spread

  • Mayonnaise
  • Condensed milk

Method

  1. In a bowl, mix flour, salt and sugar until well mixed. Make a well in the middle and put in egg, well-frothed yeast and mix.
  2. Don't pour all the water in at once. While working the dough, pour in the water a little a time and stop when you feel it's getting a little wet and sticky.
  3. Continue working the dough until gluten forms, then add in butter.
  4. Knead until dough leaves the side of the bowl. (means the dough will clean whatever that is stuck at the side of the bowl)
  5. Grease a bowl and leave to prove until double in size. (Around an hour)
  6. Punch out gas and knead dough into ball and let rest for a further 5-10 mins.
  7. The dough will weigh around 1000g (give and take a few gms). Divide dough into whatever proportions you want. I divided mine into 20 pieces of 50g buns.
  8. Shape buns into small ball. For the floss bun, I rolled the round dough into an elongated shape. For the star buns, I flatten the ball of dough with my palms and fitted 1/2 a sausage in the middle, closed the dough into half and cut (just enough to cut the sausage, not reaching the end of the side of the dough) into 4 equal portions. Take 2 parts of the cut dough and twist, press down. Do the same for the other 2 parts.
  9. Grease tray and place dough slightly apart. (Putting them near to each other will cause the bread to later "fuse" with the neighbour)
  10. Let rest for a further 1/2 hour. Brush top with egg wash at 190 degree for 15-18 mins.
  11. Cool bread well before storing it.
  12. For CondensedMayo spread, mix 3 Tbsp of mayo with 5-6 Tbsp of condensed milk. (My mum suggested adding more condensed milk coz she thinks it's not sweet enough). This spread is enough to last you ages.

Learn from our mistakes

I haven't been idling since my last entry. My old GEC convectional oven is working hard these past few days, and in the process, I also burnt a few fingers *Ouch*.

Last Friday I baked 2 loaves of bread. The dough was rolled up like a swiss roll with chicken floss as the filling. I think it proofed too much so it didn't look remotely close to what I wanted it to look like. Too embarrassed to show you the results.

Then came the next ambitious project. Puff Pastry. I have tried it once before, but it became such a gooey mess I lost faith. Recently, I chanced upon a video of 2 lovely ladies who made it look so easy I decided to give it a try again.

Putting negative thoughts aside, and with a renewed faith, I embarked on my dream of making the perfect puff pastry. In fact, I lost several nights of sleep just replaying the whole process in my head. On Monday, I laid everything I needed on the table and started.

I regretted not consolidating all the information I had in my limited RAM (a.k.a my Brain) before I started, instead I relied solely on the video. The frozen butter was so STIFF I took such a long time to get the dough working. (* On hindsight, it did me some good. I found my long-lost stomach muscle. The stiff butter, and later the frozen dough was so hard I had to use so much strength to roll and in the process I worked some muscles that I thought was extinct. I actually had sore stomach and tricep muscles the day after! *)

From the title above, you must have guessed what the outcome was. This time round, however, I was closer to making it work. I told Ken I was not daunted, my puff pastry will make a come-back again. His remark was encouraging. 不屈的精神,值得鼓励. Well, though my curry puff didn't puff up, I had a little success when I cut out a portion of the dough to test out before the rest went back to the freezer. This is what came out from it.

I cut the dough using a flower mould and placed some raspberry jam on top. Notice how the puff actually puffs up a little! Anyway, I messed up the rest of the dough but my dear guinea pigs at home still finished them up without any complaints.


Lessons learnt:

  • If a voice inside your head tells you "NO!", Listen. That voice is almost always right
  • Be systematic, TRY to take notes on information you have gathered. For myself, I have an unreliable memory, so it always take me ages to scour through info in my head
  • A tip from Gordon Ramsay - "Don't scrunch them together in a ball or you will lose the layers". I saw this tip too late. Forgot the number of times I scrunched the dough. Silly.

Thursday, July 30, 2009

New Kid on the Blog

Carol and I were so inspired with food blogs from other mums that we are attempting to start one on our own. We'll work hard on our recipes and see how it'll turn out!